Building applications
4. GraphQL clients
In this chapter you will learn how to build a GraphQL client using React and Apollo GraphQL.
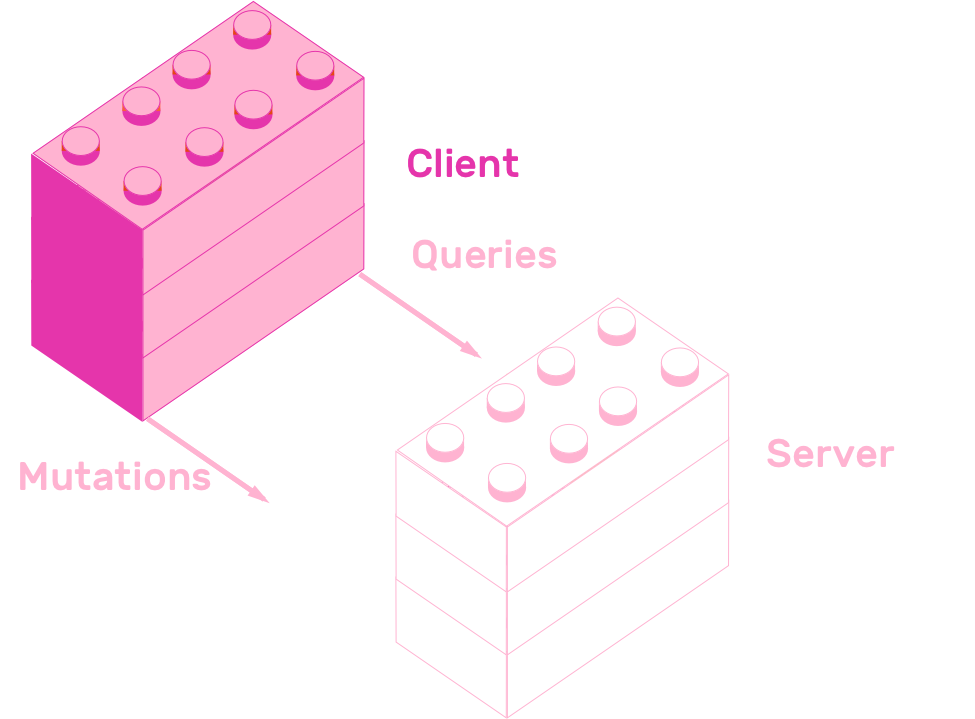
You will start with a bare-bones React application, and transform it step-by-step into a GraphQL powered Pinterest clone. The first step will be making an app with all state stored in the client. After that you will learn how to add a GraphQL library called Apollo Client. Finally, you will learn how to easily fetch and store data in the GraphQL server using React Apollo's Query and Mutation components.
Let's start with the initial version of PinApp.
4.1 Initial React client
The first version of PinApp's client consists of a single App component that renders a div that says "PinApp". The project's setup is pretty standard, since it's based on the super popular create-react-app. Here is the complete source code for src/App.js:
import React from 'react'

export default class App extends React.Component {
  render() {
    return <div>PinApp</div>
  }
}
Remix this project to create your own copy of it:
The next section will teach you how to create a client side version of PinApp.
4.2 Client side state
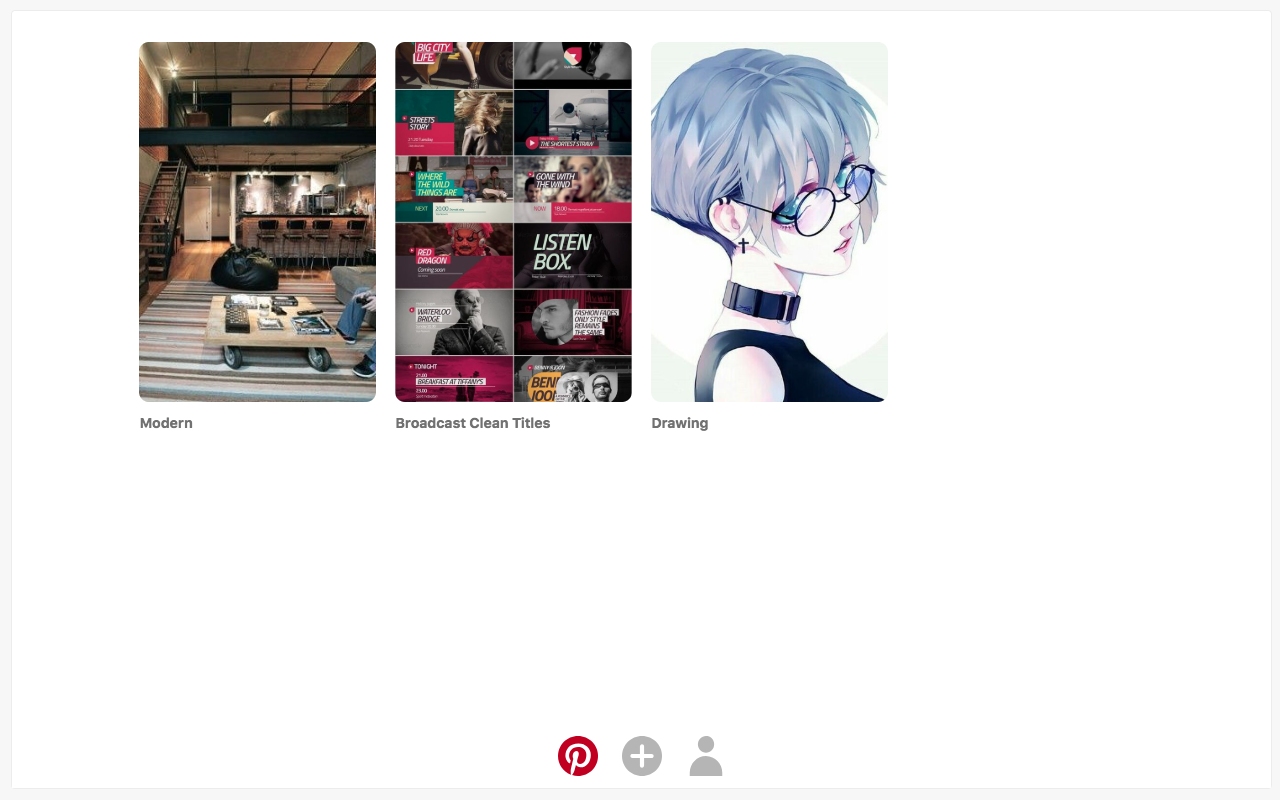
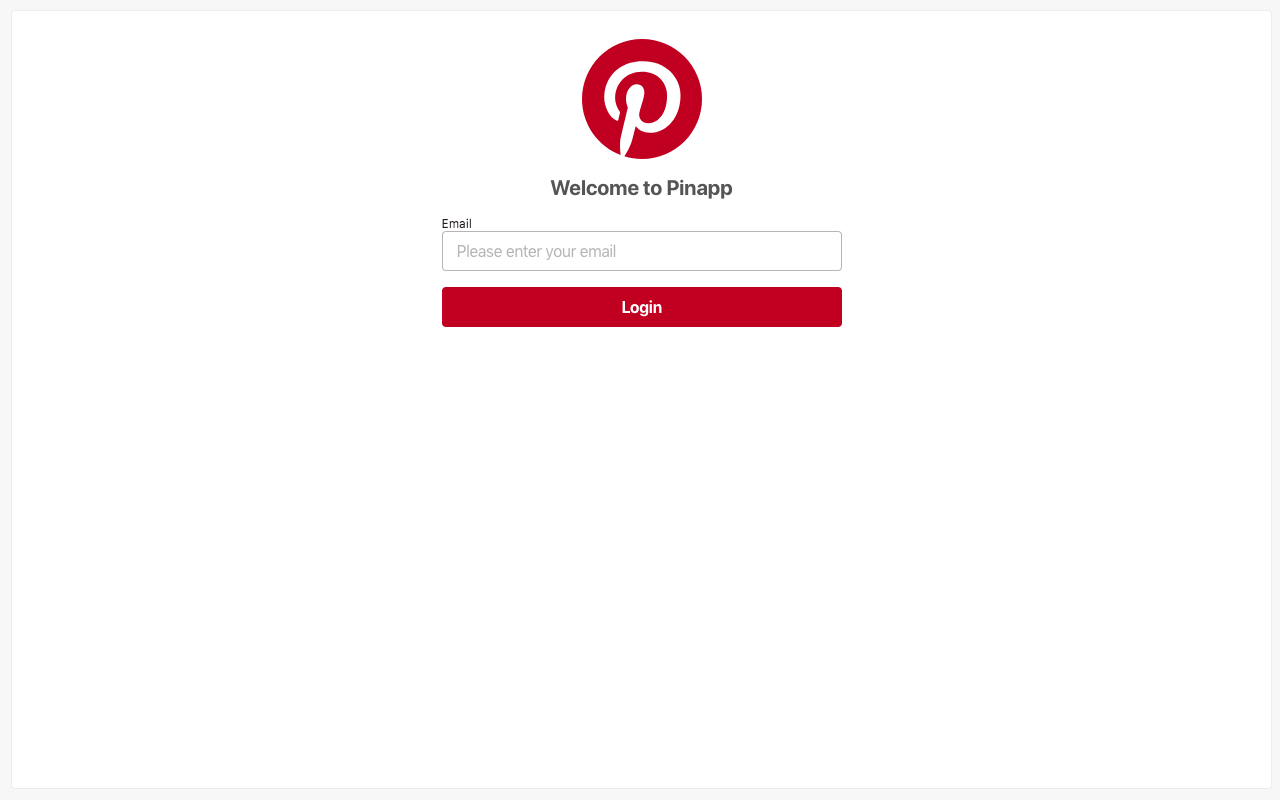
This section will teach you how to create a working, client-side only version of PinApp. To achieve this, you will use a library called pinapp-components. This library exports a Container component, a Nav component and also five Page components, PinListPage, LoginPage, VerifyPage, AddPinPage and ProfilePage. To get to know all of these components, see them live in the playground.
These components expose a well defined API via their props. This customization enables you to use them to create a version of PinApp using only local state and passing it via props. Using the same components, but passing different props, you will create a version of PinApp backed by the GraphQL API you created in the previous chapter.
Following is a brief description of all components.
Container sets up PinApp's styling and routing configuration. Render it as the first in your component hierarchy. It only receives children as props.
Nav renders a list of actions as the app's footer. Actions are links to /, /upload-pin and /profile.
The rest of the components define a page each.
PinListPage renders a list of pins in the / URL. It receives just one argument, pins. pins is an array that contains a list of pins. Pins must be object with title, image and link properties. All three properties must be Strings.
LoginPage sets up the /login URL. It receives only one prop, authenticate. It is a function that will run when the user clicks "login". This function receives a string as an argument, which contains an email that the user entered.
VerifyPage sets up a screen in the /verify?token={token} URL. This component receives one prop called verify. It is a function that will run when the component mounts. This function passes a string argument which contains the token that the user entered in the URL's query string.
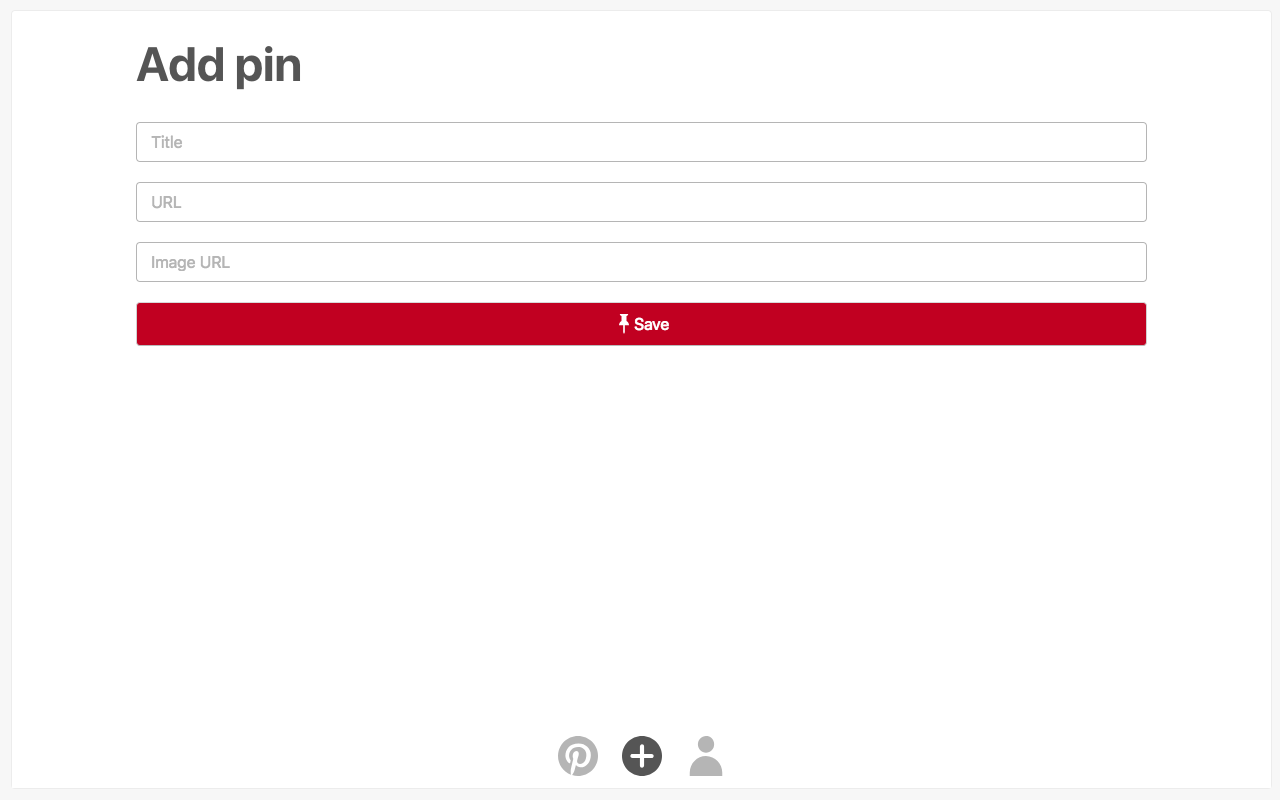
AddPinPage renders a form to create a pin in the /upload-pin URL. This component receives two props, authenticated and addPin. authenticated is a boolean. addPin is a function that will run when the user clicks "Save". It receives a pin object as argument.
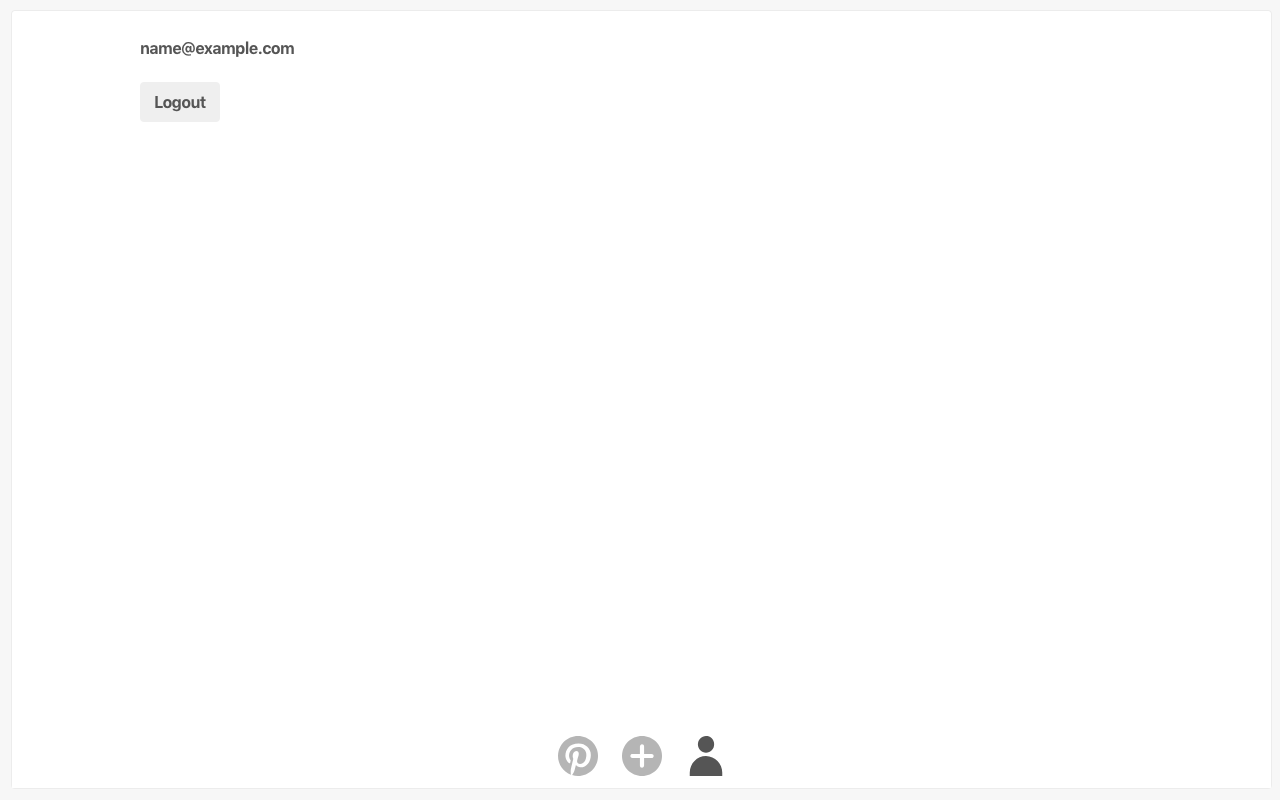
The last page component is ProfilePage. It shows the users' profile in the /profile URL. It receives three props, user, authenticated and logout. user is an object with an email property. authenticated is a boolean. logout is a function that will run when the user clicks "Logout". It does not receive any arguments.
Now let's talk about how state management. The app will have three keys in state. It will hold an array of pins, a boolean called authenticated and a user object. The App component will have three functions that directly modify this state, called addPin, verify and logout. To simulate authentication, it will have an authenticate function that always authenticates the user. This App component will pass down its state and functions as props to the components from pinapp-components.
The first thing you need to do is add "pinapp-components": "^1.0.1" to the "dependencies" key in your package.json.
After adding pinapp-components as a dependency, modify src/App.js to look like this:
import React from 'react'
import {
  Container,
  Nav,
  PinListPage,
  AddPinPage,
  LoginPage,
  VerifyPage,
  ProfilePage,
} from 'pinapp-components'

export default class App extends React.Component {
  state = { pins: [], authenticated: false, user: null }
  addPin = (pin) => {
    this.setState(({ pins }) => ({
      pins: pins.concat([pin]),
    }))
  }
  verify = () => {
    return success().then((token) =>
      this.setState({
        authenticated: true,
        user: { email: 'name@example.com' },
      })
    )
  }
  authenticate = () => {
    return Promise.resolve({})
  }
  logout = () => {
    this.setState({ authenticated: false, user: null })
  }
  render() {
    return (
      <Container>
        <PinListPage pins={this.state.pins} />
        <AddPinPage
          authenticated={this.state.authenticated}
          addPin={this.addPin}
        />
        <LoginPage authenticate={this.authenticate} />
        <VerifyPage verify={this.verify} />
        <ProfilePage
          authenticated={this.state.authenticated}
          user={this.state.user}
          logout={this.logout}
        />
        <Nav authenticated={this.state.authenticated} />
      </Container>
    )
  }
}

function success() {
  return wait(1000).then(() => 'long-lived-token')
}

function wait(time) {
  return new Promise((resolve, reject) => {
    setTimeout(resolve, time)
  })
}
Remix this step's application if you got stuck in some way.
Congratulations! You have got a working version of PinApp. Too bad that all pins get lost when you refresh the application. This happens because the app stores everything in-memory. The next couple of sections will teach you how to connect PinApp with your GraphQL API.
4.3 Apollo Client
In this section you will add Apollo Client to PinApp's frontend. You will setup Apollo Client, point it to the API you created in the previous chapter, and send a query to that endpoint.
Apollo Client is a GraphQL Client that provides advanced data loading to Javascript applications. It provides wrappers to many popular Javascript frameworks, like React, React Native, Angular, Vue.js, it also provides Native iOS and Android versions.
To install it, you need to add three dependencies to package.json. These dependencies are apollo-boost",, graphql and graphql-tag. This is what your "dependencies" key should look like:
"dependencies": {
  "react-scripts": "^1.1.4",
  "react": "^16.3.2",
  "react-dom": "^16.3.2",
  "pinapp-components": "^1.0.1",
  "apollo-boost": "^0.1.6",
  "graphql": "^0.13.2",
  "graphql-tag": "^2.9.2"
},
Now it's time to setup Apollo Client in src/App.js. Import apollo-boost as ApolloClient and import graphql-tag as gql.
After that, create a new instance of ApolloClient, pass it an object with an uri key pointing to your GraphQL API URL, and assign it to a variable called client.
import ApolloClient from 'apollo-boost'
import gql from 'graphql-tag'

const client = new ApolloClient({
  uri: process.env.REACT_APP_API_URL,
})
Remember to add REACT_APP_API_URL=https://pinapp-files.glitch.me to the .env file, pointing to your API URL.
Once you have created an instance of Apollo Client, you can use it to send queries and mutations to your API. Let's use the query method from Apollo Client to fetch the list of pins from the API. This method receives an object with a query key. Inside that key you can send queries using the gql function from graphql-tag.
The gql function receives a string written in SDL and transforms it into a Javascript object. client.query accepts this Javascript object. Note that client.query throws an error if you pass a string directly, without using gql.
Another handy feature of gql is that many IDEs add syntax highlighting to gql calls. Unfortunately, at the moment Glitch does not support this feature. But who knows, maybe in the future it supports gql syntax highlighting. And maybe you are reading this in the future and enjoying beautiful GraphQL queries in our Glitch's code examples.
Add the following componentDidMount function to the App component:
componentDidMount() {
  client
    .query({
      query: gql`
        {
          pins {
            title
            image
            link
          }
        }
      `
    })
    .then(result => this.setState({ pins: result.data.pins }));
}
You can click here to remix this step's version of PinApp. Remember to edit REACT_APP_API_URL in .env.
As you can see, it's really easy to use Apollo Client to communicate with GraphQL APIs. But Apollo Client provides an even better way of connecting your React application with a GraphQL API. It provides a library called React Apollo, which lets you collocate components with data by placing queries alongside your components. The next section will teach you how to setup React Apollo to interact with PinApp's API.
4.4 React Apollo
React Apollo is a library that lets you declaratively specify your component's data requirements. This means that your components can specify what data they need, instead of how to fetch that data. You achieve this by placing GraphQL queries in your components, and delegating how to fetch that data to Apollo Client.
4.5 Query component
A component that React Apollo provides is called Query. It receives one prop, called query, which accepts a GraphQL query. This component also receives a function as a child. Functions as child is a React pattern that lets you pass data from parents to children. Many of React Apollo's component use this pattern to pass down information. You can read more about passing functions to component in React's official documentation.
The Query component passes down an object to its children. It contains three keys, loading, error and data. loading is a boolean that is true when the component started fetching data, but has not finished yet. error is an object that contains GraphQL errors, if any. data is an object that contains the GraphQL API's response.
Let's use this Query component. Create a file called src/PinListPage.js. If loading is true, it will return the Spinner from pinapp-components. If error is defined, it will display a div with the text "Error". And if data is defined, it will return PinListPage from pinapp-components.
import React from 'react'
import { Query } from 'react-apollo'
import { PinListPage, Spinner } from 'pinapp-components'

import { LIST_PINS } from './queries'

class PinListPageContainer extends React.Component {
  render() {
    return (
      <Query query={LIST_PINS}>
        {({ loading, error, data }) => {
          if (loading) {
            return <Spinner accessibilityLabel="Loading pins" show />
          }
          if (error) {
            return <div>Error</div>
          }
          return <PinListPage pins={data.pins} />
        }}
      </Query>
    )
  }
}

export default PinListPageContainer
You may have noticed that PinListPage.js references LIST_PINS from queries. Create this new file called src/queries.js. It will contain all queries that PinApp needs. Paste the following code in this new file.
import gql from 'graphql-tag'

export const ADD_PIN = gql`
  mutation AddPin($pin: PinInput!) {
    addPin(pin: $pin) {
      title
      link
      image
    }
  }
`

export const LIST_PINS = gql`
  {
    pins {
      id
      title
      link
      image
      user_id
    }
  }
`

export const CREATE_LONG_LIVED_TOKEN = gql`
  mutation CreateLongLivedToken($token: String!) {
    createLongLivedToken(token: $token)
  }
`

export const CREATE_SHORT_LIVED_TOKEN = gql`
  mutation CreateShortLivedToken($email: String!) {
    sendShortLivedToken(email: $email)
  }
`

export const ME = gql`
  {
    me {
      email
    }
  }
`
4.6 Apollo Provider
In order to use React Apollo's Query component, you need to wrap your application with a component named ApolloProvider. It receives an instance of ApolloClient, and provides querying capabilities to Query components inside the component hierarchy.
import { ApolloProvider } from 'react-apollo'
Remove PinListPage from the list of imports from pinapp-components and import it from the file you just created.
import PinListPage from './PinListPage'
Put ApolloProvider as the first component in App's render. Also remove pins prop from PinListPage because it does not need it anymore.
<ApolloProvider client={client}>
  <Container>
    <PinListPage />
    {/* ... */}
  </Container>
</ApolloProvider>
Finally, you can now delete the componentDidMount function, because you load the list of pins using Query.
You can start seeing the benefits of declarative fetching using React Apollo, compared to fetching data in React's lifecycle methods, like componentDidMount.
4.7 Mutation component
React Apollo provides a component called Mutation that allows you to collocate mutations with React components.
It works similarly to Query, it receives a query as a prop and it also receives a function as its child.
It receives a GraphQL query, in this case that property is called mutation instead of query.
Similarly to Query, it receives a function as its child. The main difference is that this component passes down a function as its first argument, instead of an object with data, loading and error. It actually passes that object as a second argument, it will contain the data returned by the mutation. Calling this function will send a mutation to the GraphQL API configured in ApolloProvider.
Let's use React Apollo's Mutation. Create a file called src/LoginPage.js. Inside it, create a React class Component that returns Mutation in its render method. Place a function as a child of Mutation. This function will receive an argument called createShortLivedToken. LoginPage will receive a function in its authenticate property that calls createShortLivedToken when the user clicks "Login".
import React from 'react'
import { Mutation } from 'react-apollo'
import { LoginPage } from 'pinapp-components'

import { CREATE_SHORT_LIVED_TOKEN } from './queries'

class LoginPageContainer extends React.Component {
  render() {
    return (
      <Mutation mutation={CREATE_SHORT_LIVED_TOKEN}>
        {(createShortLivedToken) => (
          <LoginPage
            authenticate={(email) =>
              createShortLivedToken({
                variables: { email },
              })
            }
          />
        )}
      </Mutation>
    )
  }
}

export default LoginPageContainer
To use this component, remove LoginPage from the list of pinapp-components import in src/App.js and import it from the file you just created.
After sending a mutation to the server, you usually want to update the data in your app. For example, after adding a pin, you want to update the list of pins in your application. An easy way to achieve this is using another property from Mutation, called refetchQueries. It receives an array that contains the list of GraphQL queries to send after the mutation finishes.
To see refetchQueries in use, create a file called src/AddPinPage.js with the following contents:
import React from 'react'
import { Mutation } from 'react-apollo'

import { AddPinPage } from 'pinapp-components'
import { ADD_PIN, LIST_PINS } from './queries'

class AddPinPageContainer extends React.Component {
  render() {
    return (
      <Mutation mutation={ADD_PIN}>
        {(addPin) => (
          <AddPinPage
            authenticated={this.props.authenticated}
            addPin={(pin) =>
              addPin({
                variables: { pin },
                refetchQueries: [{ query: LIST_PINS }],
              })
            }
          />
        )}
      </Mutation>
    )
  }
}

export default AddPinPageContainer
Another useful prop that Mutation receives is called update. It is a function that gets called once your mutation finishes. You can use it to update React Apollo's internal state after a mutation finishes. In this case you are going to use it to get access to the token that the createLongLived query returns.
Create a file called src/VerifyPage.js and place the following code in it.
import React from 'react'
import { Mutation } from 'react-apollo'
import { VerifyPage } from 'pinapp-components'

import { CREATE_LONG_LIVED_TOKEN, ME } from './queries'

class VerifyPageContainer extends React.Component {
  render() {
    return (
      <Mutation
        mutation={CREATE_LONG_LIVED_TOKEN}
        update={(cache, { data }) => {
          if (data && data.createLongLivedToken) {
            this.props.onToken(data.createLongLivedToken)
          }
        }}
      >
        {(createLongLivedToken) => (
          <VerifyPage
            verify={(shortLivedToken) =>
              createLongLivedToken({
                variables: {
                  token: shortLivedToken,
                },
                refetchQueries: [{ query: ME }],
              })
            }
          />
        )}
      </Mutation>
    )
  }
}

export default VerifyPageContainer
The App component will use onToken to update its state with the authentication token.
<VerifyPage
  onToken={(token) => {
    localStorage.setItem('token', token)
    this.setState({ token })
  }}
/>
The final file you need to create is src/ProfilePage.js. This file does not contain any new API that you need to know. It uses Query, just like PinListPage. It uses the ME query from queries.js. This is what this file looks like:
import React from 'react'
import { Query } from 'react-apollo'
import { ProfilePage } from 'pinapp-components'

import { ME } from './queries'

class ProfilePageContainer extends React.Component {
  render() {
    if (!this.props.authenticated) {
      return (
        <ProfilePage
          authenticated={this.props.authenticated}
          logout={this.props.logout}
          user={null}
        />
      )
    }
    return (
      <Query query={ME}>
        {({ loading, error, data }) => {
          return (
            <ProfilePage
              authenticated={this.props.authenticated}
              logout={this.props.logout}
              user={{
                email: data && data.me ? data.me.email : null,
              }}
            />
          )
        }}
      </Query>
    )
  }
}

export default ProfilePageContainer
The last step you need to take before reaching the final version of PinApp is replacing src/App.js with the following code:
import React from 'react'
import ApolloClient from 'apollo-boost'
import { ApolloProvider } from 'react-apollo'
import { Container, Nav } from 'pinapp-components'

import PinListPage from './PinListPage'
import LoginPage from './LoginPage'
import VerifyPage from './VerifyPage'
import AddPinPage from './AddPinPage'
import ProfilePage from './ProfilePage'

const client = new ApolloClient({
  uri: process.env.REACT_APP_API_URL,
  request: (operation) => {
    if (this.state.token) {
      operation.setContext({
        headers: { Authorization: this.state.token },
      })
    }
  },
})

export default class App extends React.Component {
  state = {
    token: null,
  }
  componentDidMount() {
    const token = localStorage.getItem('token')
    if (token) {
      this.setState({ token })
    }
  }
  logout = () => {
    localStorage.removeItem('token')
    this.setState({ token: null })
  }
  render() {
    return (
      <ApolloProvider client={client}>
        <Container>
          <PinListPage />
          <AddPinPage authenticated={!!this.state.token} />
          <LoginPage />
          <VerifyPage
            onToken={(token) => {
              localStorage.setItem('token', token)
              this.setState({ token })
            }}
          />
          <ProfilePage
            authenticated={!!this.state.token}
            logout={this.logout}
          />
          <Nav authenticated={!!this.state.token} />
        </Container>
      </ApolloProvider>
    )
  }
}
Remix the final version of PinApp's client to see what it looks like.
4.5 Summary
You created a version of PinApp using only local state, learned how to use Apollo Client and React Apollo to connect this app with a GraphQL API. You achieved this using React Apollo's Query and Mutation to easily send queries and mutations.
The next chapter will teach you how to add real time functionality to apps using GraphQL Subscriptions, which let GraphQL APIs push data to clients.