Building applications
3. GraphQL APIs
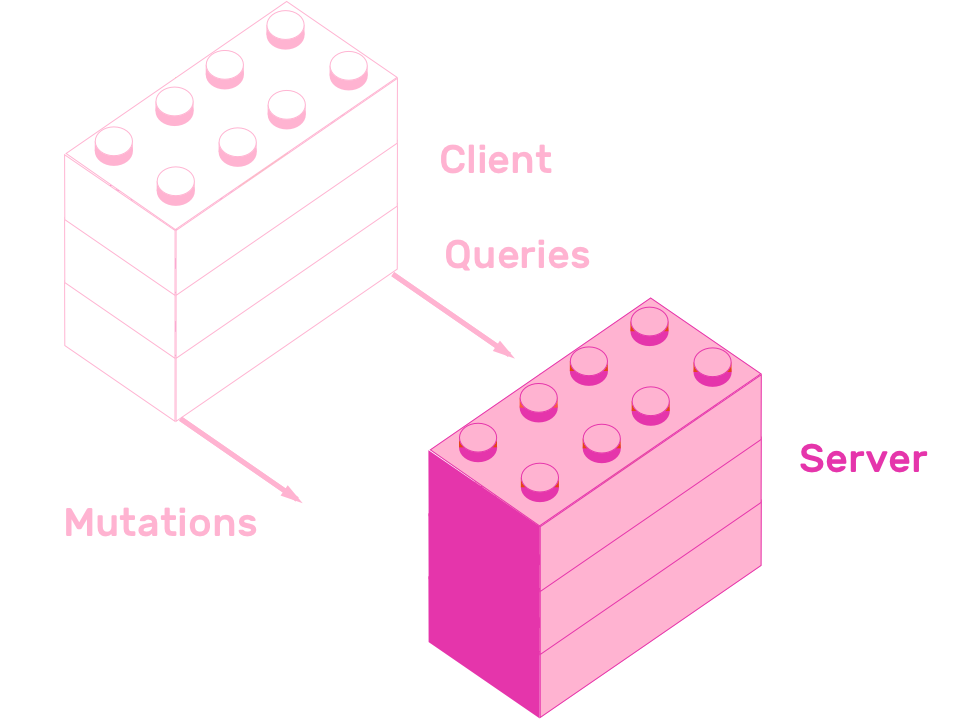
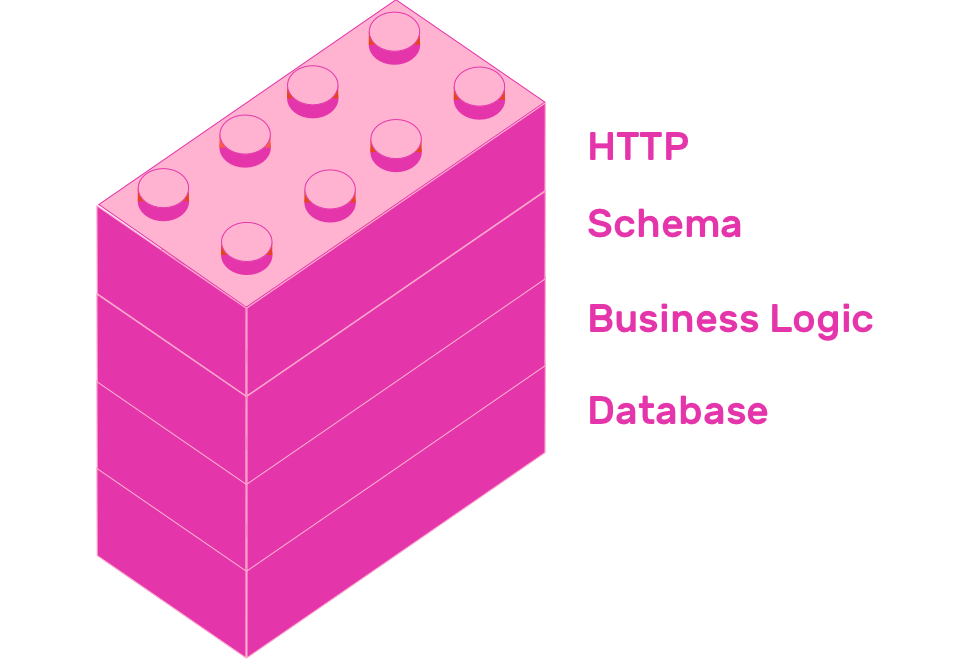
The most common way of exposing a GraphQL schema is with an HTTP server. Building GraphQL APIs is much more than just designing schemas. This chapter will teach you how to create robust, layered GraphQL APIs.
You will learn how to expose GraphQL schemas using Apollo Server. How to connect your resolvers to a database. You will add email based authentication to your API. Finally you will learn how to organize your source code based on features.
All stages in this chapter have a corresponding project, which you can remix to learn by practice.
Let's start by learning how to create an API using Apollo Server.
3.1 Server
Apollo Server is an open source, spec-compliant GraphQL server. It is a production-ready, easy to setup way of exposing GraphQL schemas, so HTTP clients can consume them.
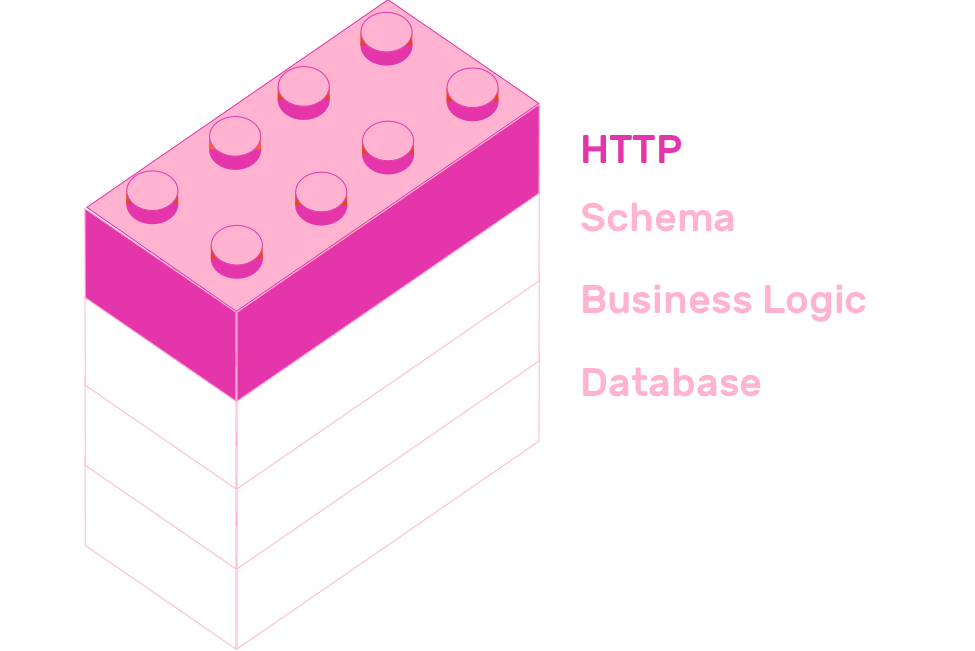
You already created a schema using graphql-tools in the previous chapter, so exposing it with Apollo Server is really straightforward.
const { ApolloServer } = require('apollo-server')

const schema = require('./schema')

const server = new ApolloServer({ schema })

server.listen().then(({ url }) => {
  console.log(`🚀  Server ready at ${url}`)
})
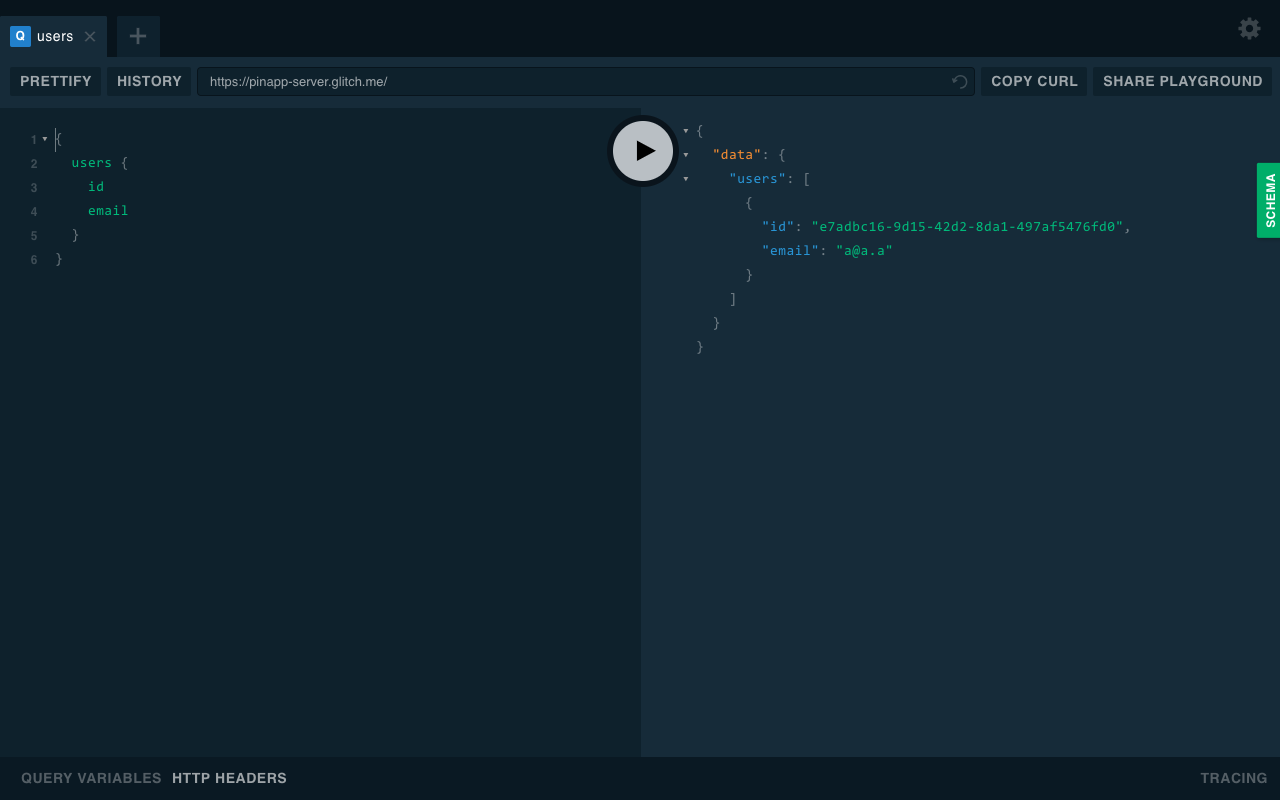
That's really it! With just a call to server.listen() you have a live GraphQL API. Remix the following example project to create your own copy.
Click the Show button, on the top left of the screen, to open a batteries included GraphQL client called GraphQL Playground. It is more than just a GraphQL client, it almost feels like an IDE. It has query autocomplete, it has GraphQL schema documentation and it stores all your queries so you can reuse them later.
Now that you have deployed your GraphQL API, it's time to add persistence using a database.
3.2 Database
GraphQL APIs can be backed up by any data source. They can use SQL databases, NoSQL, in-memory databases or even use HTTP endpoints.
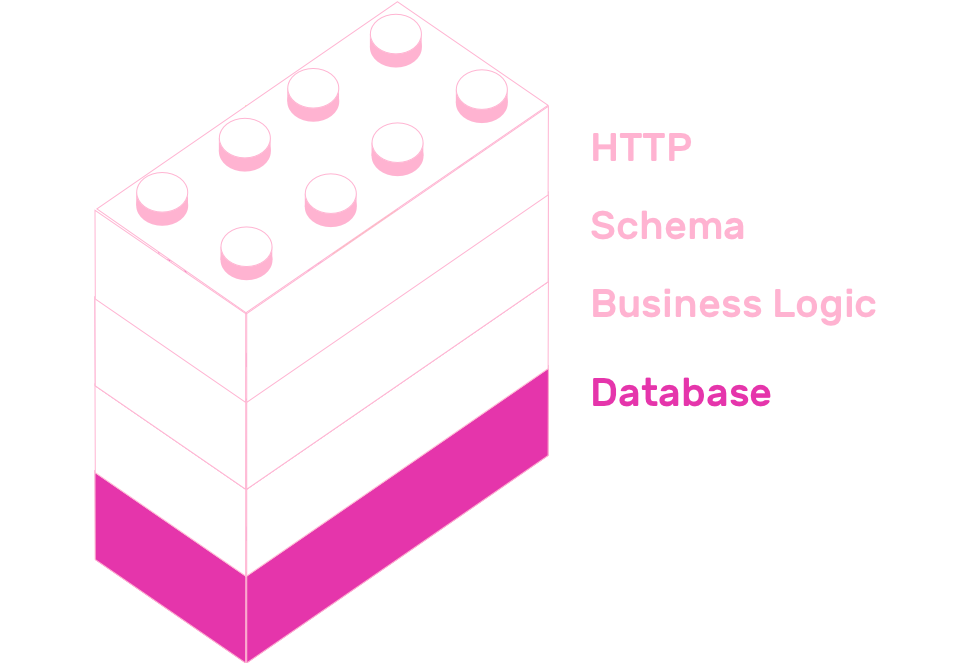
In this chapter you will connect PinApp to a SQLite database using a database connector called Knex. Knex is a SQL query builder that can communicate with many SQL databases, like SQLite3, MySQL, Postgres and more.
Remix the current iteration of PinApp so you can follow along the contents of this section with your own copy of the project.
Remember to follow the getting started instructions on the project's README
Since all database related interactions happen in resolvers.js, let's start with the contents of that file.
Retrieve a set of records using select(). For example this is how to get the list of pins.
pins: () => database("pins").select(),
You can chain together Knex functions. For example you can filter results from a select() by chaining its call with the where() function.
search: (_, { text }) => {
  return Promise.all([
    database('users').select().where('email', 'like', `%${text}%`),
    database('pins').select().where('title', 'like', `%${text}%`),
  ])
}
Another useful function that knex provides is insert(). It allows you to create objects in your database. This is how the addPin mutation looks like using insert.
addPin: async (_, { pin }, { token }) => {
  const [user] = await authorize(token);
  const { user: updatedUser, pin: createdPin } = await addPin(user, pin);
  await database("pins").insert(createdPin);
  return createdPin;
},
The file called database.js creates an instance of knex and exports it as a module. It is a simple file that creates a knex instance with configuration values from a file called knexfile.js.
const database = require('knex')(require('./knexfile'))

module.exports = database
Knex provides a CLI which provides several utilities for creating migrations, seeding databases, and more. It reads configuration from knexfile.js. PinApp's configuration file looks like this:
module.exports = {
  client: 'sqlite3',
  connection: {
    filename: '.data/database.sqlite',
  },
}
Glitch allows you to persist data inside the
.datafolder. This is whydatabase.sqliteis located in that folder.
The final step you need in order to use a SQL file is to generate your database schema. Knex allows you to generate migration files using its CLI.
Running npx knex migrate:make create_users_table creates a file called [date]_create_users_table.js inside the .migrations folder. This file exports two methods, up and down. These files are placeholders, which you need to fill in with your specific needs. In this case, the user table needs to have two fields, id and email. Both will have type string. The id field will be a primary key.
exports.up = function (knex) {
  return knex.schema.createTable('users', function (table) {
    table.string('id').primary()
    table.string('email')
  })
}

exports.down = function (knex) {
  return knex.schema.dropTable('users')
}
There is another migration in the project you remixed, called [date]_create_pins_migration. It defines five string fields: id, title, link, image and pin_id.
exports.up = function (knex) {
  return knex.schema.createTable('pins', function (table) {
    table.string('id').primary()
    table.string('title')
    table.string('link')
    table.string('image')
    table
      .string('user_id')
      .references('id')
      .inTable('users')
      .onDelete('CASCADE')
      .onUpdate('CASCADE')
  })
}

exports.down = function (knex) {
  return knex.schema.dropTable('pins')
}
Running npm run setup-db will apply all database migrations. This script is defined in the scripts key of package.json:
"setup-db": "knex migrate:latest"`
Teaching SQL is outside of the scope of this book, it needs a book on its own if you want to properly learn it. Knex does a great job at interacting with SQL databases for Javascript users, and it has great documentation. Refer to it if you want to learn more about it.
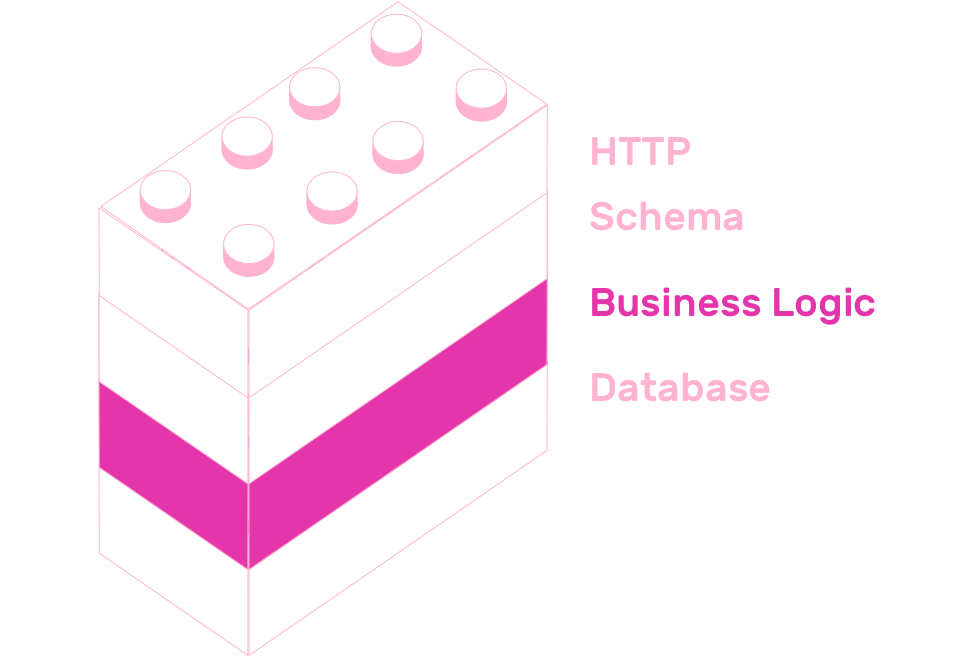
3.3 Authentication
A common question when building GraphQL APIs is "Where to put authentication and authorization?". Should it be in the GraphQL layer? Database layer? Business logic? Even though the answer depends on the context of what API you are building, a common way to solve this problem is to put authentication and authorization in the business layer. Putting auth related code in the business layer is Facebook's approach.
You can implement auth in several ways, that is entirely up to your needs. This section will teach you how to add email based authentication to PinApp.
Email based authentication consists of providing an email input to your users. Once they submit their email, you send them an authentication token inside a link to your app. If they enter your app using a valid token, you can trust this user. Once they enter your site with a valid token, you exchange that temporary token with a token with a longer expiration date.
The biggest advantage of this authentication system, as opposed to good old password-based authentication, is that you don't need to deal with passwords at all. Deciding not to store passwords means you don't have to take extreme security measures to keep them safe. It also means that your users don't have to deal with yet another site that asks them to create a new password.
Feature: Email based authentication

  Scenario: Send magic link
    Given a user enters his email address
    When he/she submits the form
    Then he/she should receive an email with a link to the app that contains his token

  Scenario: Verify email
    Given a user receives an email with a magic link
    When he/she clicks the link
    Then he/she should see a loading screen
    When the app verifies the token
    Then he/she should see an email confirmation message
Speaking of GraphQL terms, both of these actions are mapped onto mutations in their corresponding GraphQL schema, called sendShortLivedToken and createLongLivedToken. The first action receives an email as argument, which is of type String. The second action receives a token and returns the new token.
type Mutation {
  # ...
  sendShortLivedToken(email: String!): Boolean
  createLongLivedToken(token: String!): String
}
Remix this project so you can follow the implementation of email based auth.
Remix email authentication example
Now let's analyze how the email-related resolvers look like.
The resolver for sendShortLivedToken should check if the user that corresponds to the email exists. If it doesn't exist, then it should insert it into the database. After this, it should create a token with a short expiration time, and send it to the user's email.
sendShortLivedToken: async (_, { email }) => {
  let user
  const userExists = await database('users').select().where({ email })
  if (userExists.length) {
    user = userExists[0]
  } else {
    user = createUser(email)
    await database('users').insert(user)
  }
  const token = createShortLivedToken(user)
  return sendShortLivedToken(email, token)
}
This resolver uses two functions from business-logic.js, createShortLivedToken and sendShortLivedToken.
The first one creates a token using the jsonwebtoken NPM package's sign function. This token will have an expiration time of five minutes.
const createShortLivedToken = ({ email, id }) => {
  return jsonwebtoken.sign({ id, email }, process.env.SECRET, {
    expiresIn: '5m',
  })
}
The second function, sendShortLivedToken, uses a function defined in email.js called sendMail.
const sendShortLivedToken = (email, token) => {
  return sendMail({
    from: '"Julian" <julian@graphql.college>',
    to: email,
    text: `${process.env.APP_URL}/verify?token=${token}`,
    html: `<a href="${process.env.APP_URL}/verify?token=${token}" target="_blank">Authenticate</a>`,
    subject: 'Auth token',
  })
}
To send mails, you will use the nodemailer package. This library allows you to send emails through an SMTP server. The easiest way to create an email server for development purposes is with Ethereal. This is a fake email service developed by the creators of Nodemailer, and it is a super easy way to create dev SMTP services. Of course, if you want to send actual emails, you should use a real SMTP service. Sendgrid has a great free plan.
const nodemailer = require('nodemailer')

const transporter = nodemailer.createTransport({
  host: 'smtp.ethereal.email',
  port: 587,
  auth: {
    user: process.env.MAIL_USER,
    pass: process.env.MAIL_PASSWORD,
  },
})

function sendMail({ from, to, subject, text, html }) {
  const mailOptions = {
    from,
    to,
    subject,
    text,
    html,
  }
  return new Promise((resolve, reject) => {
    transporter.sendMail(mailOptions, (error, info) => {
      if (error) {
        return reject(error)
      }
      resolve(info)
    })
  })
}

module.exports = sendMail
The implementation of createLongLivedToken is much simpler than sendShortLivedToken. It uses a function from business-logic.js that verifies the token it receives as argument. If that token is valid, it creates a token with an expiration date of thirty days.
const createLongLivedToken = (token) => {
  try {
    const { id, email } = jsonwebtoken.verify(token, process.env.SECRET)
    const longLivedToken = jsonwebtoken.sign(
      { id, email },
      process.env.SECRET,
      { expiresIn: '30 days' }
    )
    return Promise.resolve(longLivedToken)
  } catch (error) {
    console.error(error)
    throw error
  }
}
Go ahead and configure your remixed project with your Ethereal account. Once you have setup everything, hop into GraphQL Playground by clicking the "Show" button and authenticate using your email (or any email actually, Ethereal intercepts all of them :D).
3.4 File organization
This section will teach you how to use graphql-import to organize Node.js GraphQL APIs by features. GraphQL import allows you to import and export type definitions in GraphQL SDL.
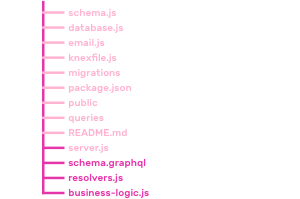
Up to this point, all files in the sample repository are organized by role, but this approach does not scale well for large projects. Right now, resolvers are in resolvers.js, type definitions are in schema.graphql and all business logic is in business-logic.js. As the projects grows bigger and bigger, this three files will end up becoming too large and unmanageable.
The project's current file structure looks like this:
You are going to split schema.graphql, resolvers.js and business-logic.js into three features: authentication, pins and search. The final directory structure will be the following:
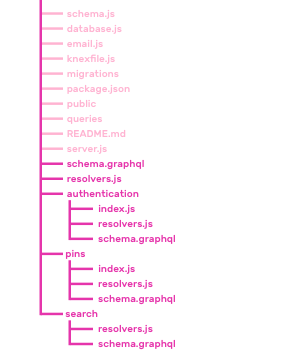
Remix the project if you want to see how the final version looks like.
Remix file organization example
The main entry point of the GraphQL schema will still be schema.graphql. The difference is that it will not contain any type definitions, it will import all types from the schema.graphql of every feature folder. The main schema will import the rest of the schemas using the import statement that graphql-import provides. Its syntax is # import * from "module-name.graphql".
# import * from "authentication/schema.graphql"
# import * from "pins/schema.graphql"
# import * from "search/schema.graphql"
This way of importing GraphQL SDL is possible because schema.js loads schema.graphql with the following snippet:
const { importSchema } = require('graphql-import')

const typeDefs = importSchema('schema.graphql')
// ...
Similarly to the schema, the main entry point for all resolvers will remain the same. It will still be resolvers.js. NodeJS already provides a way to import and export files using require, so you don't need any additional library. Even though this file does not need any additional library to import modules, it uses a library to merge the resolvers it imports. You could use pure Javascript to achieve this, but lodash.merge is a nice way to merge many Javascript objects.
const merge = require('lodash.merge')

const searchResolvers = require('./search/resolvers.js')
const authenticationResolvers = require('./authentication/resolvers.js')
const pinsResolvers = require('./pins/resolvers.js')

const resolvers = merge(searchResolvers, authenticationResolvers, pinsResolvers)

module.exports = resolvers
To finish the file structure changes, split business-logic.js, resolvers.js and schema.graphql. Split business-logic.js into authentication/index.js and pins/index.js. Split resolvers.js into authentication/resolvers.js, pins/resolvers.js and search/resolvers.js. Finally split schema.graphql into the three new folders.
That's it! Using a feature based file structure is a scalable way of organizing code. It may be overkill for small projects, but it pays off in big ones.
3.5 Summary
You learned how to create a GraphQL API using Apollo Server. Starting from just a GraphQL schema, you learned how to wrap that schema with an HTTP layer using ApolloServer. You added a database layer using Knex, email based authentication with Nodemailer. In the last step, you organized your project by features using GraphQL Import.
The next chapter will teach you how to create GraphQL clients using Apollo Client. You will learn how to implement a frontend in React that communicates with the GraphQL API you just created.